How to Install Driver Packages Without Digital Signatures with Tailored Procedures

How to Install Driver Packages Without Digital Signatures with Tailored Procedures
Disclaimer: This post includes affiliate links
If you click on a link and make a purchase, I may receive a commission at no extra cost to you.
Install Unsigned Drivers
There are cases when we try to install drivers on Windows and the following windows appears:
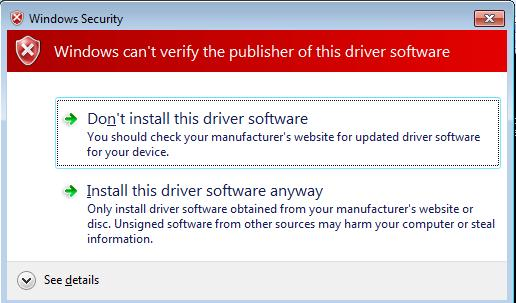
And we must click : “Install this driver software anyway”.
This is happening because that particular driver is unsigned. In the IT Pros world we need to make sure that these types of drivers are installed silently and no interaction to the user is necessary. We can install the driver without any prompt in following way :
Tools that you need: (most are from the Windows Driver Kit – the latest version of Windows Driver Kit W11 22H2 ):
Inf2Cat.exe (To generate the unsigned catalog file from our INF)
Makecert.exe (Used to create our certificate)
Signtool.Exe (Sign our catalog file with an Authenticode digital signature)
Certmgr.exe (Used to add and delete our certificate to the system root)
Let’s have a look at each step that you must take to get your unsigned certificates installed silently.
Create a digital certificate by using the MakeCert tool
Open an x86/x64 Free Build Environment command prompt with administrator permissions, by right-clicking x86 Free Build Environment on the Start menu, and then selecting Run as administrator.
At the x86/x64 Free Build Environment command prompt, type the following command on a single line (it appears here on multiple lines for clarity and to fit space limitations):
makecert -r -n “CN=Name”
-ss CertStore
-sr LocalMachine
Copy
Ex: makecert -r -n CN=”TestCert” -ss Root -sr LocalMachine
The meaning of each parameter is as follows:
-r
Specifies that the certificate is to be “self-signed,” rather than signed by a CA. Also called a “root” certificate.
-n “CN= Name “
Specifies the name associated with this new certificate. It is recommended that you use a certificate name that clearly identifies the certificate and its purpose.
-ss CertStore
Specifies the name of the certificate store in which the new certificate is placed.
-sr LocalMachine
Specifies that the certificate store created by the -ss option is in the per computer store, instead of the default per user store.

The command returns the message “Succeeded” when the store and certificate are created.
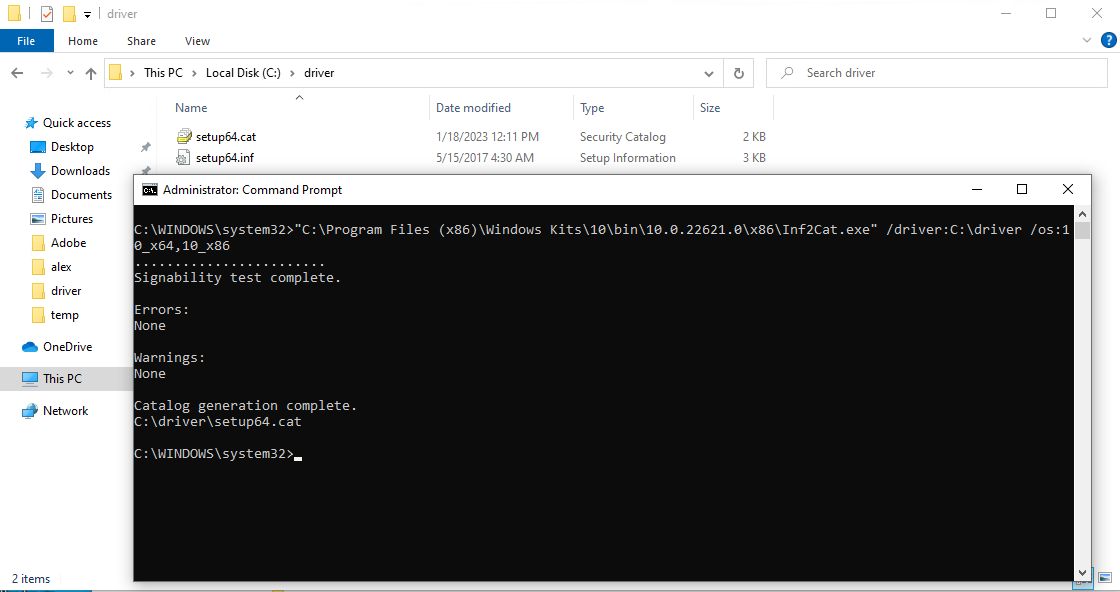
Create a .cat (catalog) file for the driver
We notice that some drivers don’t contain a cat file, so we’ll need to generate one.
Open the .INF file in a text editor. Ensure that under the [version] section that you have an entry specifying a .cat file.
If it’s not there, add the lineat the end of the section. For example:
[version]Signature=xxxxxxProvider=xxxxxxCatalogFile=MyCatalogFile.cat
Copy
“MyCatalogFile.cat” is the name of the cat file that we want to generate. Not having a line specifying this will result in an “error 22.9.4 - Missing 32-bit catalog file entry” when we run Inf2Cat.exe.
Command line:
Inf2Cat.exe /driver:”<Path to folder containing driver files
Copy
Ex : Inf2cat.exe /driver:[PathToINFwithoutFile] /os:10_x64,10_x86
The meaning of each parameter is as follows:
- /driver: c:\toaster\device
Specifies the location of the .inf file for the driver package. You must specify the complete folder path. A ‘.’ character does not work here to represent the current folder.
- /os: 10_x86 or 10_x64
Identifies the 32-bit version of Windows 10 as the operating system. Run the command inf2cat /? for a complete list of supported operating systems and their codes .
Sign the catalog file using SignTool
signtool sign /v /sm /s Root /n “TestCert” /t http://timestamp.digicert.com path\example.cat
Copy
The meaning of each parameter is as follows:
- /sm
Specifies that a machine store, instead of a user store, is used
- /s CertStore
Specifies the name of the certificate store in which SignTool searches for the certificate specified by the parameter /n. In our case we look in the Root
- /n “Name ”
Specifies the name of the certificate to be used to sign the package. You must include enough of the name to allow SignTool to distinguish it from others in the store. If this name includes spaces, then you must surround the name with double quotes.
- /t path to time stamping service
Specifies the path to a time stamping service at an approved certification authority. If you purchase your certificate from a commercial vendor, they should provide you with the appropriate path to their service.
- example.cat
Specifies the path and file name of the catalog file to be signed.
Signtool indicates completion with the following message:
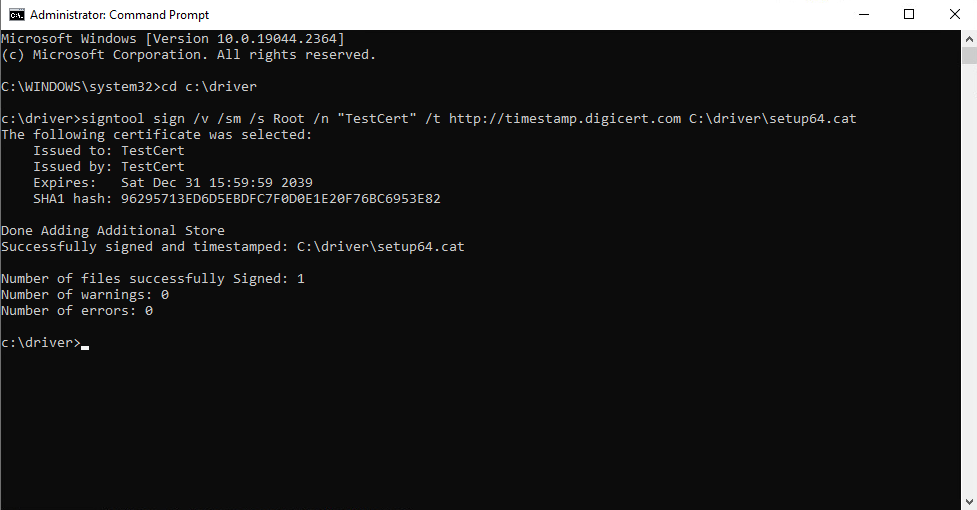
Successfully signed and timestamped: C:\toaster\device\example.cat
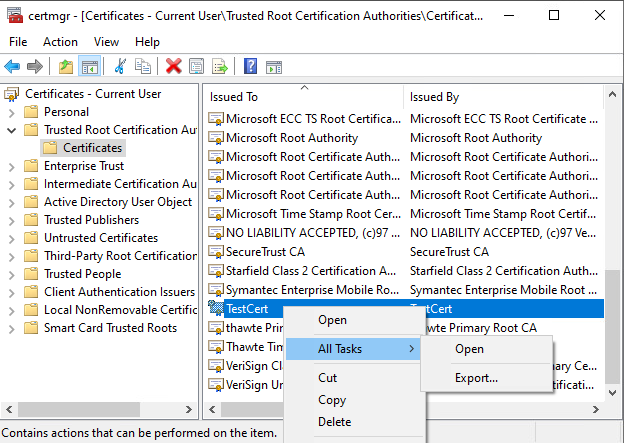
Export the certificate from certstore manually
Run an administrator command: certmgr.exe
Export the certificate manually:
Install the certificate to Root and TrustedPublisher
Command line:
certutil.exe -addstore “Root” [PathToCertificatewithFile]
certutil.exe -addstore “TrustedPublisher” [PathToCertificatewithFile]
Copy

for remove :
certutil.exe -delstore “Root” [PathToCertificatewithFile]
certutil.exe -delstore “TrustedPublisher” [PathToCertificatewithFile]
Copy
Now we can install the driver without the prompt.
Build the MSI
Now that we have understood how you sign a driver we also need to learn how you add the actions in the MSI. Basically all you need are two steps:
- Install the certificate
- Install the driver
For the second step we already had a look a chapter earlier on how to achieve that, so basically all we have to do is create a script that performs the certutil commands previously mentioned. Let’s assume that the driver .inf name is HP.inf and let’s assume that we are going to place the certificate directly into the C:\Windows\DPInst.
For VBScript:
Option Explicit
On Error Resume Next
Dim strCmd,WshShell,strInstalldir
Set WshShell = CreateObject(“WScript.Shell”)
strInstalldir = WshShell.ExpandEnvironmentStrings(“%SYSTEMROOT%”)
strCmd = “certutil.exe -addstore “ & chr(34) & “Root” & chr(34) & “ “ & chr(34) & strInstalldir & “\DPInst\TestCer.cer” & chr(34)
WshShell.Run strCmd
Copy
The script performs the following actions:
- Option Explicit: This statement enforces variable declaration in the script, ensuring that all variables are explicitly declared before they are used.
- On Error Resume Next: This statement allows the script to continue running even if an error occurs, bypassing the error and continuing with the next line of code.
- Dim strCmd, WshShell, strInstalldir: Declares three variables: strCmd to hold the command to be executed, WshShell to access the Windows Script Host Shell object, and strInstalldir to store the expanded value of the %SYSTEMROOT% environment variable.
- Set WshShell = CreateObject(“WScript.Shell”): Creates an instance of the Windows Script Host Shell object, which allows the script to run shell commands and interact with the Windows environment.
- strInstalldir = WshShell.ExpandEnvironmentStrings(“%SYSTEMROOT%”): Retrieves the value of the %SYSTEMROOT% environment variable using the ExpandEnvironmentStrings method of the WshShell object. The %SYSTEMROOT% variable represents the path to the Windows installation directory.
- strCmd = “certutil.exe -addstore “ & chr(34) & “Root” & chr(34) & “ “ & chr(34) & strInstalldir & “\DPInst\TestCer.cer” & chr(34): Constructs the command to be executed. It uses the certutil.exe utility to add a certificate (TestCer.cer) to the “Root” certificate store. The path to the certificate file is obtained by combining strInstalldir (Windows installation directory) with the relative path \DPInst\TestCer.cer. The chr(34) is used to insert double quotes into the command string.
- WshShell.Run strCmd: Executes the command stored in the strCmd variable using the Run method of the WshShell object. This runs the command in a separate process.
In summary, the script uses VBScript to execute the certutil.exe command and add a certificate (TestCer.cer) to the “Root” certificate store. The script retrieves the Windows installation directory, constructs the command with the appropriate paths and options, and then runs it using the WshShell object.
Once the script is created, navigate to the Custom Actions Page and add the Launch attached file predefined custom action into the sequence, select the installation vbscript file that was previously created and configure the Custom Action as such:
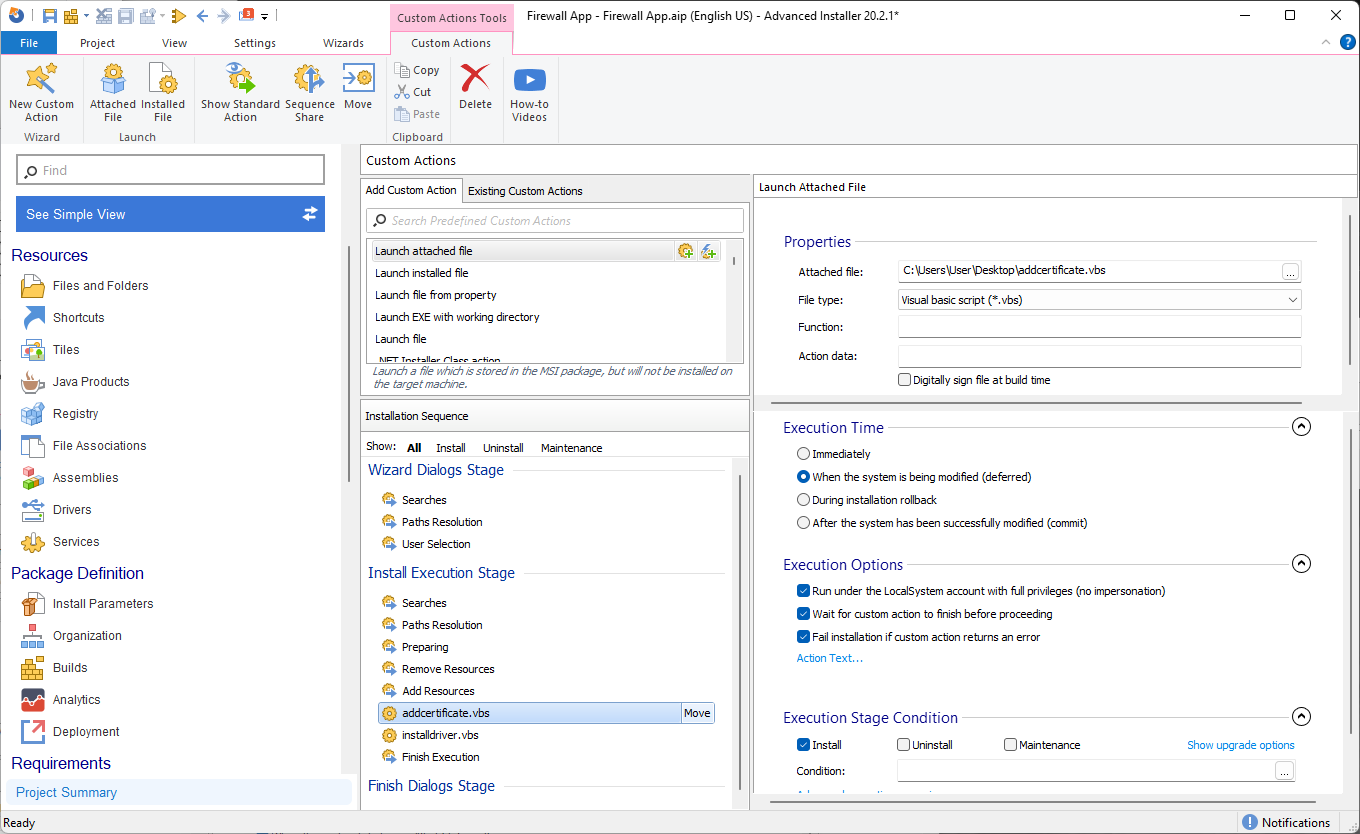
Make sure that the script which installs the certificate is placed before the script which installs the driver under the “Install Execution Stage” section.
With PowerShell it’s even easier because we can use the Import-Certificate cmdlet :
$CerLocation = $env:SystemRoot + “\DPInst\TestCer.cer”
Import-Certificate -FilePath $CerLocation -CertStoreLocation Cert:\LocalMachine\Root
Import-Certificate -FilePath $CerLocation -CertStoreLocation Cert:\LocalMachine\TrustedPublisher
Copy
Once we have the script ready, navigate to the Custom Actions Page and add the Run PowerShell script file predefined custom action into the sequence, select Attached Script and select the file that was previously created and configure the Custom Action as such:
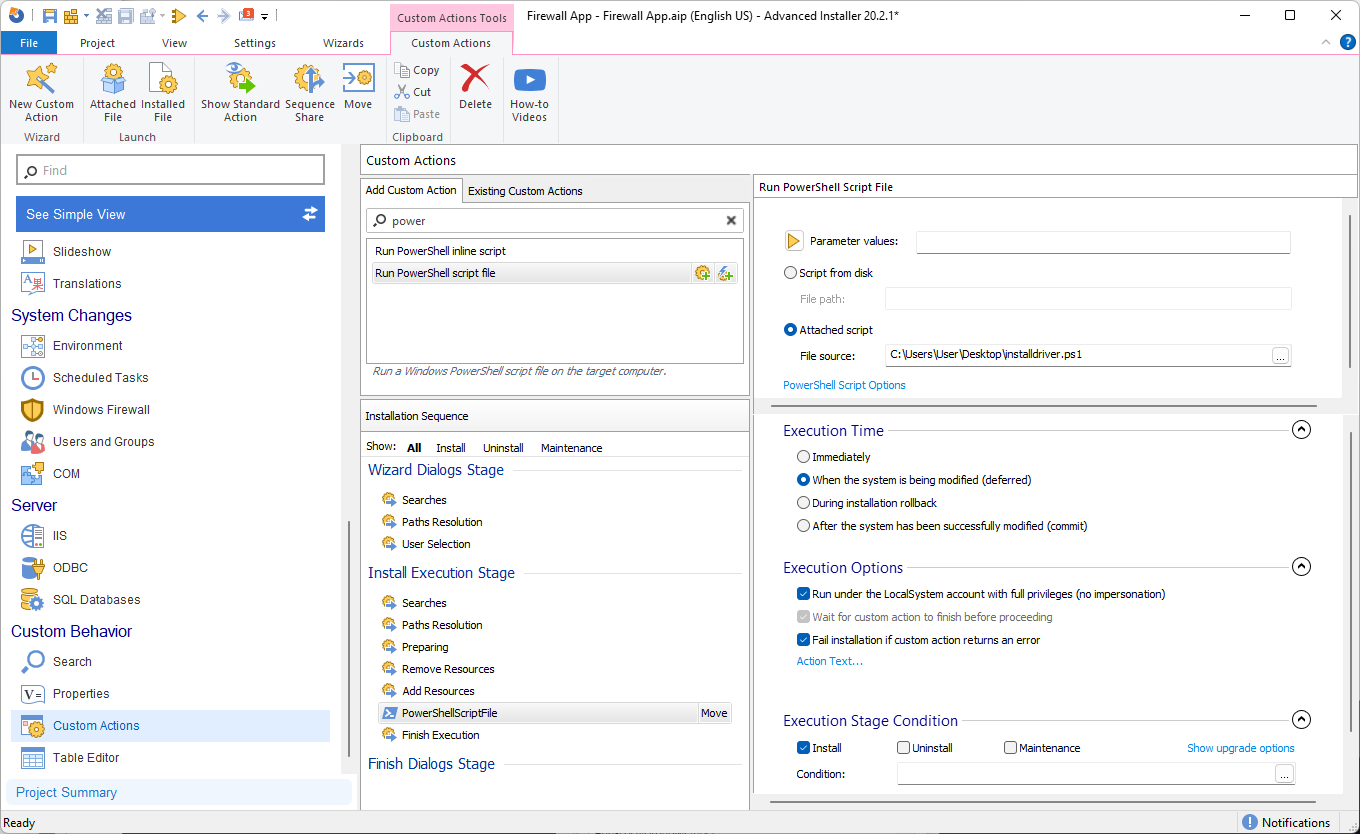
Next, build the package and during installation/uninstallation the PowerShell scripts will run and install/uninstall the driver without asking if we want to install an unsigned driver.
Installing unsigned drivers with Advanced Installer
As you can see, handling unsigned certificates is not an easy task and it’s definitely time consuming. Advanced Installer makes it easier to install unsigned drivers with just a click of a button..and yes that is not a figure of speech.
Navigate to the Drivers page and click on New Driver. A window will open for you to select the .inf file which must be present in the package.

Next, all you have to do is just select “Install unsigned driver packages and driver packages that have missing files” and Advanced Installer does everything for you!
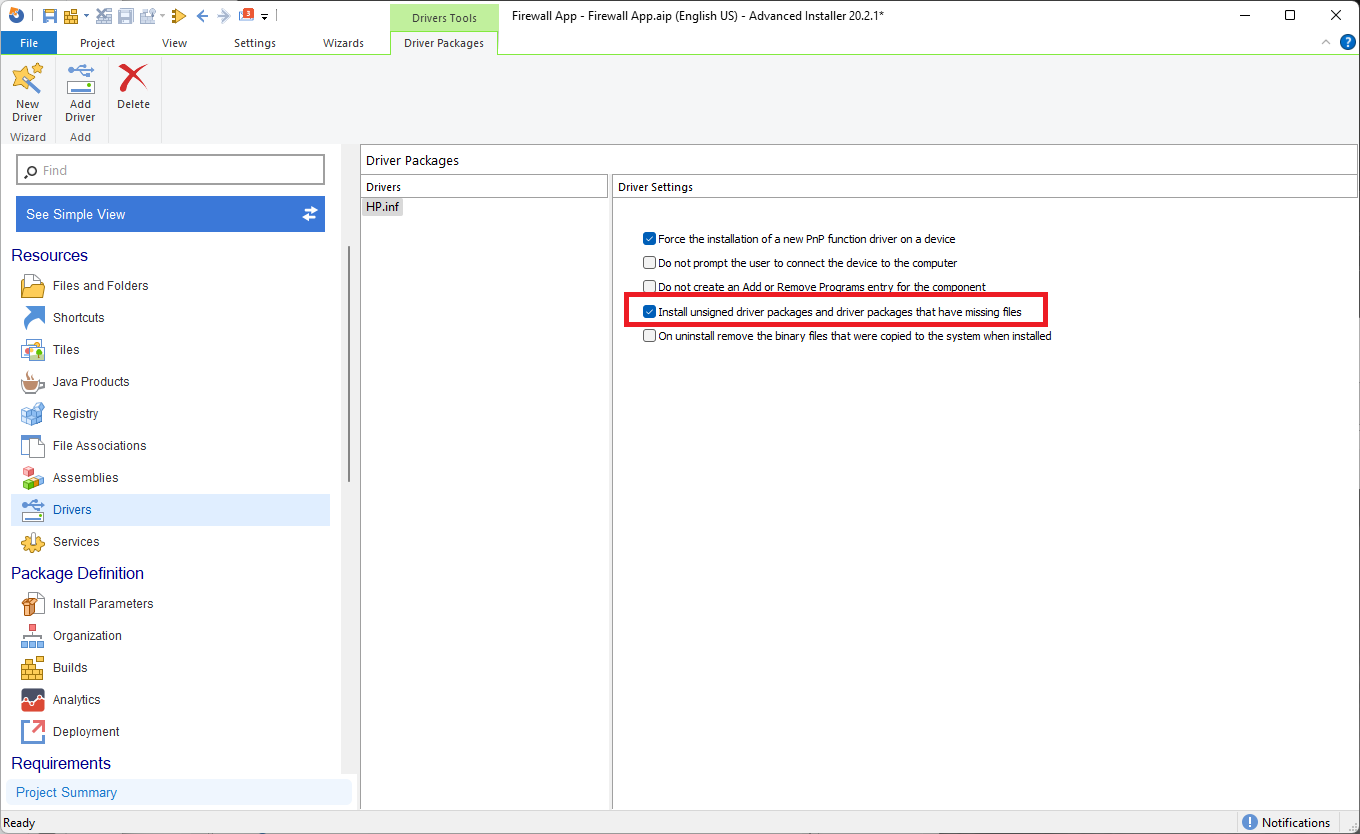
And that is it! Next, just build and install the package and you should have a clean installation without any warning messages from the OS.
Also read:
- [New] 2024 Approved The Ultimate Video Upgrade with Enhancer 2.2
- [New] Easy Process Extracting YouTube Media Directly
- [New] Identifying Tech Giants IPhone X & Samsung's Face Recognition
- Advanced Techniques for Handling Package Dependencies Within Microsoft's Installer Framework
- Annotated List of the Deadliest Digital Plagues: Unraveling the Dark Side of Technology with a Review of Historic Malware Foxes
- Antivirus Limitations and Advanced Safeguards Necessary for Optimal Security Online
- Basics of Effective FB Ad CTA Design for 2024
- Discover the Best Video Shrinking Apps for Your iPhone: A Trilogy of Solutions!
- Essential Unknown Capabilities of iOS 11: A Must-Know List for Tech Enthusiasts
- Find Your Favorites Ranking of 8 Preferred MP3 Extractors (Android) for 2024
- How To Fix The Specified Module Could Not Be Found
- Professionelle DVD Rip Und Verbesserung Mit WinXDVD - Ultimative Lösung Für HD Videoübertragung Auf Mobilgeräte
- Step-by-Step Guide: Wireless and USB File Sharing Between Your PC & Galaxy S4
- The Ultimate Troubleshooting for Retrieving Deleted Conversations Following the iOS 12 Upgrade
- パソコン上でのビデオ回転技術 - 無料ガイド
- Title: How to Install Driver Packages Without Digital Signatures with Tailored Procedures
- Author: Thomas
- Created at : 2024-10-05 01:24:49
- Updated at : 2024-10-11 00:16:04
- Link: https://win-cloud.techidaily.com/how-to-install-driver-packages-without-digital-signatures-with-tailored-procedures/
- License: This work is licensed under CC BY-NC-SA 4.0.